Mastering the Art of Tonkotsu: Your 13-Hour Broth Journey Begins
Few culinary experiences rival the soul-warming comfort and rich depth of a truly authentic bowl of tonkotsu ramen. That creamy, opaque broth, brimming with umami and a satisfying, lip-smacking richness, is the very heart of the dish. If you've ever found yourself daydreaming about that perfect spoonful after a visit to a cherished ramen-ya, you're not alone. Many culinary adventurers, myself included, have embarked on a quest to bring that restaurant-quality experience into our own kitchens.
For a long time, recreating that iconic Master Homemade Tonkotsu: Rich, Creamy Ramen Broth Guide seemed like an insurmountable challenge, a secret guarded closely by seasoned ramen chefs. My early attempts, I'll admit, were less than stellar – more dishwater than delectable. But through persistent experimentation, countless adjustments to ratios and simmering times, and a deep dive into the philosophy behind this revered Japanese staple, I finally cracked the code. And I'm here to tell you, mastering this tonkotsu broth recipe is not just possible, it's incredibly rewarding.
This isn't just about cooking; it's about embarking on a journey. A journey that spans roughly 13 hours, transforming humble pork and chicken bones into a velvety, flavorful elixir. It's a journey that will fill your home with the intoxicating aroma of a Tokyo ramen shop and elevate your home cooking to new heights. By the time you finish this guide, you won't just have a fantastic broth; you'll have become a true master of tonkotsu.
What is Tonkotsu? Understanding the Heart of the Broth
Before we don our aprons and gather our ingredients, let's clarify exactly what "tonkotsu" means and why it stands out from other ramen broths. Unlike many ramen styles that are named after the *tare* (flavoring sauce) added to the broth, tonkotsu ramen is unique because its name refers directly to the broth itself. 'Tonkotsu' literally translates to 'pork bones'. This tells you everything you need to know about its foundation.
The magic of tonkotsu lies not just in using pork bones, but in the meticulous preparation and prolonged cooking process that extracts every last bit of flavor, collagen, and marrow from them. This intensive simmering breaks down the bones, emulsifies fats, and releases gelatin, resulting in that signature opaque, creamy texture and profound savory taste that defines authentic tonkotsu. It’s a true testament to the power of time and patience in cooking.
The Anatomy of an Authentic Tonkotsu Broth Recipe: Ingredients & Secrets
Achieving that deep, soulful flavor and luxurious creaminess requires careful selection of ingredients. While this tonkotsu broth recipe demands quality, you'll find most items are readily available, though a visit to a good butcher is highly recommended.
- The Bones – The Backbone of Flavor:
- Pork Bones: This is where the richness comes from. Look for a variety of pork bones, such as femurs, neck bones, trotters, and even pork hocks. Femur bones are excellent for marrow, which contributes significantly to the creamy texture and rich flavor. Trotters and hocks are packed with collagen, essential for that gelatinous, lip-smacking body. Aim for bones with some meat still attached for added depth.
- Chicken Carcasses: This is often a secret weapon for adding complexity. While pork provides the signature creaminess and depth, chicken carcasses contribute a beautiful lightness, a different spectrum of umami, and an additional layer of body. Combining chicken and pork creates a multi-dimensional flavor profile that's hard to achieve with a single protein source alone. This fusion is key to an Authentic Tonkotsu Broth: Secret to Creamy Pork & Chicken Flavor.
- Quality Matters: Fresh bones from a butcher are always superior to pre-packaged ones. They simply have more flavor and are less likely to have been sitting around.
- Aromatics – The Supporting Cast:
- Ginger: Fresh, vibrant ginger adds a pungent, slightly spicy warmth that cuts through the richness of the pork.
- Garlic: Whole cloves of garlic infuse the broth with a deep, savory foundation.
- Onions: Large, quartered onions add a subtle sweetness and aromatic base that complements the other flavors.
- Optional Umami Boosters: For an even deeper umami punch, consider adding a piece of dried kombu (kelp) during the last hour of simmering, or a handful of dried shiitake mushrooms. Remember to remove the kombu before it starts to get bitter.
- Water: Sounds simple, but good quality filtered water makes a difference. Since water makes up the vast majority of your broth, don't overlook this detail.
The 13-Hour Journey: Step-by-Step to Creamy Perfection
This is where patience truly pays off. The lengthy simmering time is non-negotiable for achieving the distinctive creamy texture and profound flavor of tonkotsu. Here���s how to navigate this marathon cook:
- Prepare and Blanch the Bones (The Crucial First Step):
- Clean Thoroughly: Rinse all pork and chicken bones under cold running water. You're aiming to remove any visible blood or impurities. Don't be shy; scrub them clean.
- Blanch: Place the bones in a large stockpot and cover them with cold water. Bring to a rolling boil over high heat. Skim off any scum that rises to the surface. Continue boiling for 10-15 minutes. This step is absolutely vital as it draws out impurities and strong odors that would otherwise cloud your broth and give it an off-flavor.
- Rinse Again: Drain the blanched bones, discard the dirty water, and rinse the bones once more under cold water, scrubbing off any remaining coagulated proteins or scum. Clean your stockpot thoroughly before returning the bones.
- The Long Simmer Begins:
- Combine and Cover: Place the sparkling clean bones back into your large stockpot. Add the quartered onions, whole garlic cloves, and sliced ginger. Cover everything with fresh, cold water, ensuring the bones are fully submerged by at least 2-3 inches.
- Bring to a Vigorous Boil: Bring the pot to a strong, rolling boil over high heat. This initial high heat is crucial for extracting the collagen and fats that contribute to the broth's creamy texture.
- Maintain the Boil and Skim: Once boiling vigorously, reduce the heat slightly to maintain a constant, rolling boil. This isn't a gentle simmer; you want the water to be in constant motion. For the first few hours, frequently skim any foam or excess fat that rises to the surface. While some fat is desirable for richness, too much can make the broth greasy.
- Replenish Water: As the water evaporates during the long cooking process, you must continually replenish it with hot water (to avoid shocking the bones and halting the extraction process). Always keep the bones fully submerged.
- The Transformation (Hours 5-12):
- Continue the vigorous boil, skimming as needed. You'll notice the broth gradually changing from a clear liquid to a cloudy, then increasingly opaque and milky consistency. This is the collagen and fat emulsifying into the liquid, creating that sought-after creamy texture.
- Around the 8-10 hour mark, taste the broth. It should be deeply flavorful and complex. You can remove some of the larger bone pieces that have given up most of their goodness to make more room in the pot.
- The Final Push (Hour 13+):
- By 13-14 hours, your broth should be intensely flavorful, milky white, and have a thick, unctuous consistency.
- Remove all remaining bones and aromatics from the pot.
- Strain: Carefully strain the broth through a fine-mesh sieve, ideally lined with cheesecloth, into a clean container. Press down on any solids in the sieve to extract maximum liquid.
- Cool and Store: Allow the broth to cool completely before refrigerating. As it cools, it will thicken even further, becoming a jiggly, gelatinous mass – a clear sign of its richness and collagen content.
Beyond the Broth: Serving, Storing, and Mastering Your Ramen
Congratulations, you've just created an extraordinary tonkotsu broth recipe! But the journey doesn't end here. This incredible broth is the perfect foundation for a myriad of delicious meals.
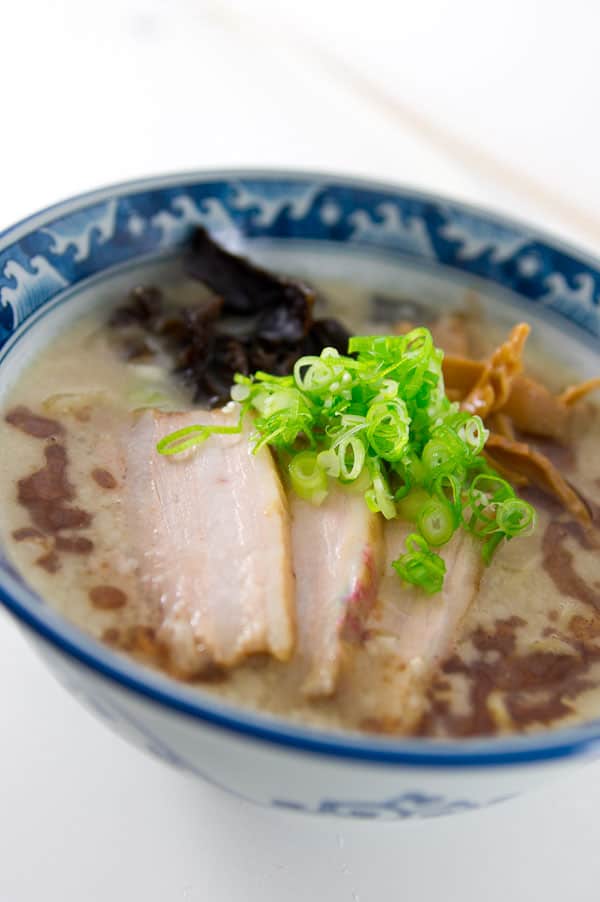
- Serving: The most obvious and satisfying use is, of course, a steaming bowl of tonkotsu ramen. Pair it with fresh ramen noodles, chashu (braised pork belly), ajitama (marinated soft-boiled egg), finely sliced scallions, wood ear mushrooms, and a sheet of nori. Remember to season your bowl with a flavorful tare (soy sauce, mirin, sake, etc.) for that complete ramen experience.
- Storing: Tonkotsu broth freezes beautifully. Divide it into individual portions or larger containers once completely cooled. It will keep in the refrigerator for 3-4 days and in the freezer for up to 3 months. This allows you to enjoy restaurant-quality ramen anytime the craving strikes, without the full 13-hour commitment each time.
- Other Uses: Don't limit yourself to ramen! This rich broth can elevate stews, hot pots, or even be used as a base for other Asian-inspired soups.
Conclusion: Your Achievement Awaits
Making your own tonkotsu broth from scratch is undoubtedly an undertaking, a true labor of love. But the reward – that deeply flavorful, incredibly rich, and velvety smooth broth – is immeasurable. It's a culinary triumph that will not only impress your family and friends but will also give you a profound appreciation for the art of ramen making. So, roll up your sleeves, commit to the 13-hour journey, and unlock the secret to restaurant-quality tonkotsu in your very own kitchen. You're now a ramen master!
