Master Homemade Tonkotsu: Your Ultimate Guide to Rich, Creamy Ramen Broth
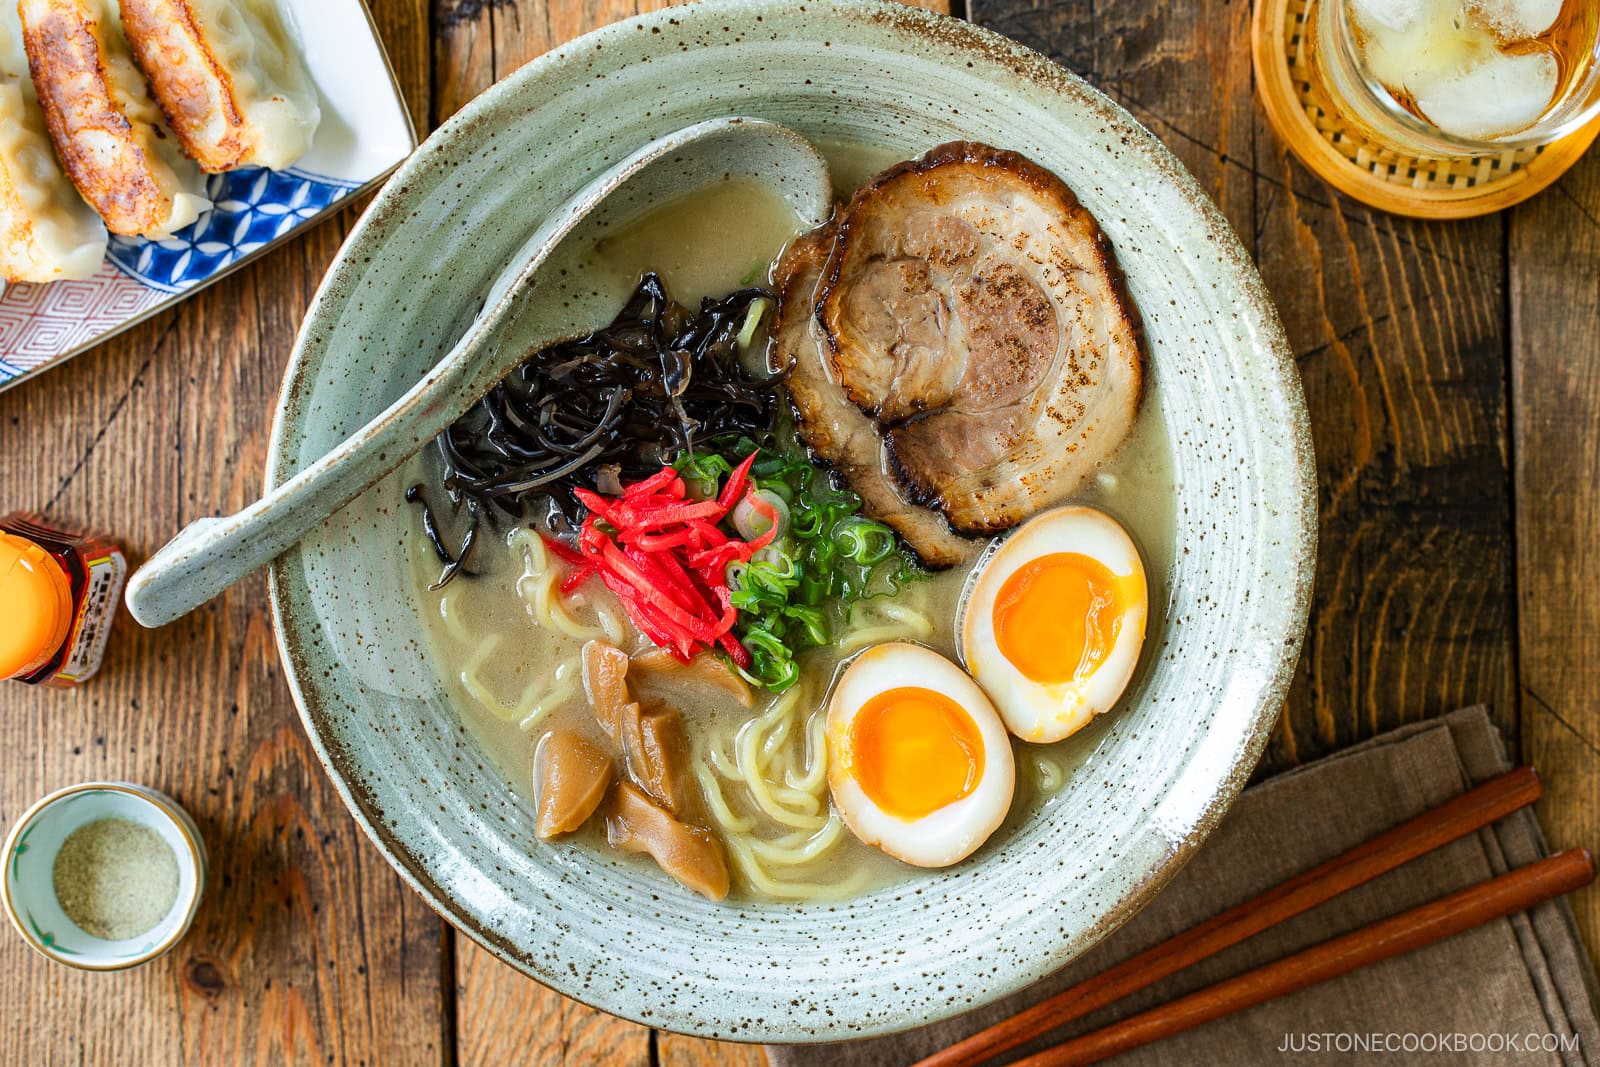
Have you ever spooned into a bowl of tonkotsu ramen so profoundly rich and creamy, you felt an instant warmth spread from your soul to your fingertips? That distinctive, milky-white broth, bursting with umami and a luxurious mouthfeel, is the backbone of truly authentic tonkotsu ramen. For many, it’s the holy grail of Japanese cuisine, often reserved for specialty ramen shops. But what if we told you that mastering this exquisite authentic tonkotsu broth is not only achievable in your own kitchen but also incredibly rewarding?
The journey to crafting the perfect homemade tonkotsu broth recipe might seem daunting at first glance. It demands patience and time – indeed, the simmering process alone can stretch beyond 13 hours. However, the techniques are straightforward, the ingredients surprisingly accessible, and the payoff is a deep, soul-satisfying flavor that transforms a simple noodle dish into an unforgettable culinary experience. Forget those $18 bowls; you’re about to unlock the secrets to restaurant-quality ramen right at home.
The Heart of Tonkotsu: Unpacking the "Pork Bone" Philosophy
The very word "Tonkotsu" provides the first clue to its essence: it literally translates to "pork bones." Unlike other ramen styles that take their names from their seasoning (like Shio for salt or Shoyu for soy sauce), tonkotsu ramen is defined by its broth. It's not just a pork stock; it's a meticulously crafted elixir born from the slow, vigorous simmering of pork bones, breaking them down until their collagen and fat emulsify into a glorious, opaque liquid.
This process is where the magic happens. As the bones simmer for an extended period, the collagen within them dissolves into gelatin. When vigorously boiled, this gelatin, along with the rendered pork fat, forms an emulsion – much like mayonnaise – resulting in the characteristic creamy texture and milky-white appearance that tonkotsu is famous for. This is what gives it that incredibly rich, lip-smacking quality.
While traditional tonkotsu primarily focuses on pork, many expert ramen chefs, and increasingly home cooks, have discovered a powerful secret: combining pork bones with chicken carcasses. This dual-protein approach, a trick often guarded by professionals, creates layers of flavor that are impossible to achieve with a single protein source. The pork bones deliver that quintessential creamy, unctuous richness, while the chicken adds a delicate lightness, depth, and a more complex body to the broth. It's a symphony of flavors that elevates your homemade tonkotsu broth recipe to new heights.
The Secret Alchemy: Ingredients for an Unforgettable Tonkotsu Broth
While the process is long, the ingredient list for an exceptional tonkotsu broth is surprisingly simple, emphasizing quality over quantity or exoticism. Here’s what you'll need to gather:
- Pork Bones: This is non-negotiable. Look for a variety of pork bones, ideally from your local butcher. Pork femurs, knuckles, and trotters are excellent choices because they are rich in marrow and collagen – the key components for that creamy texture. Ask for bones with visible marrow; that’s where a significant portion of the flavor and richness resides.
- Chicken Carcasses: As discussed, these are your secret weapon for added depth and body. Fresh carcasses are always preferred over pre-packaged, frozen ones, if available. They provide a lighter, more nuanced umami that balances the intensity of the pork.
- Aromatics: These infuse your broth with an aromatic complexity.
- Ginger: Fresh, vibrant ginger is crucial. Don't skimp on quality; tired ginger won't deliver the punch you need.
- Garlic: Whole heads of garlic, halved or smashed, release their pungent sweetness over time.
- Onions: Quartered large yellow onions add a subtle sweetness and aromatic base.
- Green Onions (Scallions): Often added in the later stages for a fresh, herbaceous note.
- Water: Since water is the primary solvent, using filtered water can make a noticeable difference in the purity of your final broth's flavor.
- Optional Umami Boosters: While not strictly traditional for the broth itself, elements like a piece of dried konbu (kelp) can be added towards the end of simmering (and removed before it overcooks) to layer in an additional profound umami. For final seasoning, remember that a good quality soy sauce – perhaps even a specialized konbu soy sauce – will be miles apart from a cheap alternative.
The Simmering Journey: Step-by-Step to Creamy Perfection
This is where patience becomes your most valuable ingredient. The process is lengthy, but largely hands-off, transforming simple bones into a liquid masterpiece.
1. Prepare Your Bones: The Foundation of Purity
This initial step is critical for achieving a clean, pure-tasting, and milky-white broth, free from impurities and off-flavors.
- Rinsing and Scrubbing: Start by thoroughly rinsing all your pork and chicken bones under cold running water. You're aiming to remove any blood or small bone fragments. Don't be shy; scrub them clean.
- Blanching (A.K.A. "Ashi Nuki"): This is perhaps the most important pre-simmering step. Place all your bones in a large stockpot and cover them with cold water. Bring the water to a rolling boil over high heat. Let it boil vigorously for 10-15 minutes. A significant amount of scum, blood, and impurities will rise to the surface.
- Post-Blanching Rinse: Drain the bones in a colander and rinse each bone individually under cold running water, scrubbing off any remaining impurities or coagulated scum. Thoroughly clean your stockpot as well. This meticulous cleaning ensures your final tonkotsu broth recipe is pristine and not clouded by unwanted flavors.
2. The Long Simmer: Unlocking the Creaminess
Now, the true transformation begins. This is where collagen breaks down and emulsifies, creating the signature creamy texture.
- The Initial Boil: Return the cleaned bones to your stockpot. Add the quartered onions, smashed garlic, and sliced ginger. Cover everything with fresh, filtered cold water. Bring it to a rapid, rolling boil over high heat. The key here is a vigorous boil, not a gentle simmer. This intensity is crucial for emulsifying the fats and collagen later on.
- Maintaining the Water Level: As the water evaporates during the long boil, you must replenish it with hot water (to avoid dropping the temperature too drastically) to keep the bones fully submerged. This prevents the broth from becoming too concentrated too quickly and ensures even extraction.
- Skimming: For the first few hours, periodically skim off any remaining scum or foam that rises to the surface. After a few hours, the amount of scum will decrease significantly. While you want to remove obvious impurities, you can allow some of the rendered fat to remain, as it contributes to the final emulsification.
- The Duration: This is where the commitment comes in. Continue boiling vigorously for a minimum of 10-12 hours, ideally up to 14-16 hours. You'll witness the magical transformation: the broth will gradually change from clear to cloudy, then to a rich, milky white. This is the sign that the collagen has broken down and emulsified, delivering that sought-after creamy consistency. For a deeper dive into this epic cooking session, refer to our guide on Unlock Restaurant-Quality Tonkotsu: A 13-Hour Broth Journey.
3. The Final Strain: Achieving Silken Smoothness
Once your broth has reached its peak milky-white richness and creamy texture, it’s time to prepare it for serving or storage.
- Remove Solids: Carefully remove all the bones and aromatics from the pot using tongs or a large slotted spoon. The bones will be incredibly soft and crumbly, having given all their goodness to the broth.
- Initial Strain: Strain the broth through a fine-mesh sieve into another large pot or heat-proof container. This removes larger particles.
- Fine Strain: For an ultra-smooth, restaurant-quality broth, line a fine-mesh sieve with cheesecloth (two layers work well) and strain the broth again. This removes even the smallest sediment, resulting in a perfectly clean and silken broth.
Mastering the Finish: Enhancing Your Homemade Tonkotsu
Congratulations! You've successfully created a phenomenal unseasoned tonkotsu broth. This is the pure, rich base. The final step is to season it to perfection, usually right before serving.
- Seasoning (Tare): It's crucial to understand that ramen broth (the base) is typically left unseasoned or only lightly seasoned. The intense flavor profile that defines a bowl of ramen comes from the "tare" – a concentrated seasoning sauce (often shio/salt-based, shoyu/soy sauce-based, or miso-based) that is added to each individual serving bowl. This allows for customization and prevents the broth from becoming overly salty if stored.
- Adjusting Consistency: If your broth is too thick after cooling, you can gently reheat it and thin it with a little hot water. If it's not quite thick enough, a final vigorous boil for a short period can help further emulsify and concentrate it.
- Storage: Your homemade tonkotsu broth can be refrigerated for 3-4 days or frozen for several months. For convenience, freeze it in individual portions (e.g., 2-cup containers) so you can easily thaw and use it for a single bowl of ramen whenever the craving strikes.
Making your own tonkotsu broth recipe is a labor of love, a culinary marathon that culminates in one of the most satisfying and delicious meals you can create. The commitment to those long hours of simmering is repaid manifold with every spoonful of this rich, creamy, and deeply flavorful broth. It’s an experience that not only satisfies your palate but also connects you to the intricate art of ramen making. So, roll up your sleeves, embrace the process, and prepare to be rewarded with the best homemade tonkotsu ramen you’ve ever tasted.
